
hi guys today we are going to see how you can create a grocery store website the best part is we’ll also convert the site into an app which should be handy for your customers so if you’re running a grocery store instead of your customers buying from your store you can let them order your products from your website or app and you can deliver the products right to their houses okay so after watching this video you will be able to create a website and a mobile app like this but you can add all your products and when people visit your
website they can purchase any product just by clicking add to cart now if they enter their payment details and click place order they orderly successfully placed on your site now once a customer places an order you will receive an order email in your inbox and you can see the order details of the customer so you can go ahead and deliver the products okay next we will also see how you can easily edit the content on your website alright the best part is we will see how you can make this website as an app like this so that it’ll be easy for
your customers to place an order so by creating a website and an app for a grocery store you can reach out to more people and grow your business it’s going to be very easy and quick I’m Ryan from website Learners and let’s start creating our grocery store website now to create a grocery store website we are going to do three parts the first part is to launch a grocery store website so this is where you will get a new website live on the internet now we are going to launch a site using make awp making WP
is a platform designed by website Learners where anyone can launch their dream website in just one click so instead of spending hours and hours setting up your website and getting it worked the way you want you can simply launch the ready-made website which is designed by us every template is built with WordPress and has all the essentials installed and ready to go you can launch this site add your content and branding and you’re good to go you can put your website into action in no time now to launch your website just
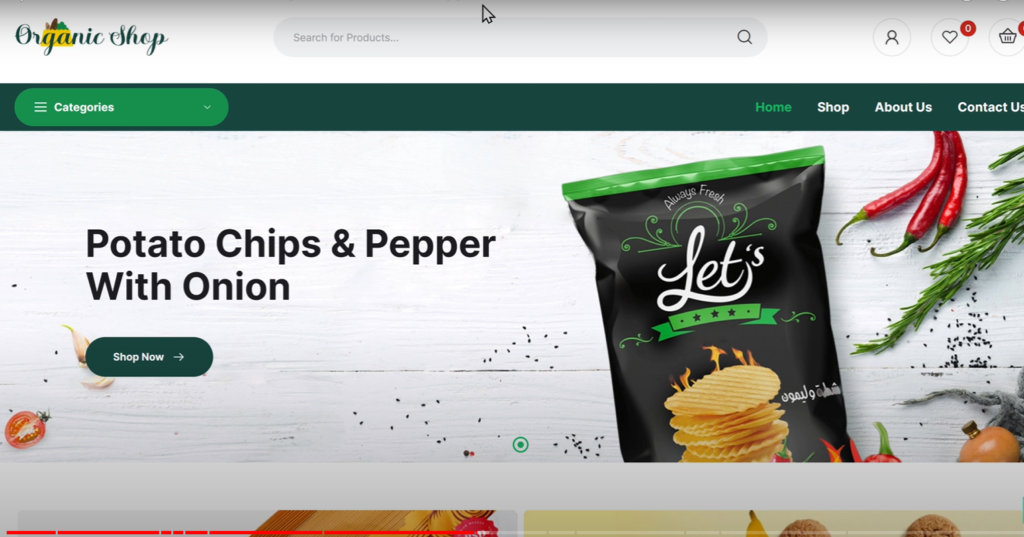
click the link below this video and it’ll take you to a website called Mega wp.com so this is where you can launch a grocery store website now to check how your website will look just click demo and you can see the preview of your grocery store website now if we click shop you can see that we have got our products and if we click on a product as we can see we have our product details here now if we view this site on mobile you can see that it’s also optimized for mobile so that your customers can place orders easily okay
once you’re ready to launch your site just click launch site and you will get this page here you will find the details of your website plan this plan is to keep your website live on the internet for one year now to launch your website here enter your details once you have done that just click next now enter your payment details then click order now and you will get this page this means that you have successfully purchased your groceries to a website now to launch your grocery store website let’s scroll down then click launch your site
and you will get this make your WP dashboard now here enter a name for your website I am going to enter Shop grocery now next here you can see that our grocery website is already selected then click launch new website and you can see that our new website has been successfully launched now if you click visit you will get a brand new website and this means your website is live on the internet so this is how you can launch a grocery store website okay okay here you can see that this is a temporary link to your website instead
of this let’s say you want to have a website name which is like your website.com so we will see how you can add that later in this video okay now if we click shop you can see that we have sample products on our website now instead of these sample products let’s say you want to add your own product to your site how will you do that so next let’s go to the second part of this tutorial where we are going to see how you can add your own products to your site now to add products to your site we are going to do three steps now
the first step is to log into your WordPress dashboard so to log into your dashboard just go to make your WP and if you click admin you will get the WordPress dashboard this is where you can manage your entire website okay once you have logged into your dashboard you can go to step two which is to delete the sample products on your site so to do that just go to products now click all products and you will get all the products on your site now to delete these sample products just click on this box and all the products will be selected
then click here and select move to trash now click apply and you can see that the sample products have been deleted now if we go to our shop and click refresh you can see that all the sample products have been removed okay once you have deleted the sample products now you can go to the final step which is to add your products to your website so to add your products just go to your site dashboard now click add new and you will get this page this is the place where you can add your products to your site so to add a product to your
shop here enter the party title I want to sell coffee beans so let’s enter that now here enter the description of your product once you’re done next here you can see your product category if your product category is not listed here just click add new category here enter the category name you want so click add new category and the category will be added to your product and here you can add your product image so let’s click set product image no drag and drop the product image from your computer and your product image will be added
let’s scroll down and here you can see your product price so let’s enter that okay next here you can add a short description about your product so let’s enter that once you’re done you can also add a gallery of your product images so to add images just click add product images now drag and drop the product images from your computer then your product images will be added so now we have added all the details about our product now to add your product just scroll to the top then click publish and your product will be published
so now if you go to our shop and click refresh you can see that we have got the product in our shop so this means we are successfully added the product to our site in the same way you can add any product you want okay now let’s say you have added some products to your site and if you click on a product you will get your product page which will have all details you have added to your product now here you can see that we have the product price in dollars let’s say you want to change the currency of your products to Indian
rupees or any other currency how will you do that now to change your currency let’s go back to our site dashboard then go to woocommerce and click settings so this is a place where you can change all the settings related to your store currency then scroll down this page and here you can select the currency for your products click here and select the currency you want I’m going to select Indian rupees and then click save now if we go back to our shop page and click refresh you can see that our currency has been
changed okay now you know how you can change your currency now let’s say a customer wants to purchase this product so if they click add to cart then click checkout and if they scroll down here you can see that it says no payment methods are available so now how can people pay for your products and purchase it not allow people to pay for your products you need to set up a payment method once you add a payment method anyone can purchase your products and you will receive the payment to your bank account so next
let’s see how you can add a payment method to your site now to add a payment method let’s go to our WordPress dashboard then click WB payments now here you can see we have stripe which is a popular payment method so we are going to connect stripe with our website to do that just click here and it’ll ask you to create an account on stripe so just enter email ID and click continue now enter a password for your account then click login and it will ask you to verify your mobile number so just enter your mobile number

then click Send text now enter the verification code which will be sent to your mobile number I am going to enter my code and your mobile number will be verified then click here and select your company type I am going to select individual once you’re done let’s click continue now enter your personal details and click continue now here select the type of business I am going to select it as we are going to add stripe to our website select website and here we need to enter a website link so just go to your website
copy a site link let’s go back to this tab paste the link here and click continue now here you need to add your bank account details so let’s enter that and when people purchase products on your site that money will be sent to your bank account now let’s click continue and it will show all the details that you have entered once you’re done just click submit then you will be taken back to your site and you can see that our step account has been successfully connected with our website now click save changes
and if you go to our website and click refresh you can see that we have got the strike payment method so now we have successfully added the strike payment method to our website okay now anyone can purchase your product by making the payment so replace an order your customers need to enter these details and then enter the payment details finally if they click place order they will get this page so this means your customer has successfully completed the payment and purchased your product okay once someone purchases a product from
your website how will you know that you have received the payment so when someone purchases a product on your site you will get a payment confirmation email to your inbox so now if we go to our inbox you can see that we have got two emails the first email is from stripe and this one is from my website so let’s open this and as you can see this is from stripe and here you can see that we have successfully received the payment for our product so this is how you can know that you have received the payment for
your order now to check another email let’s go back let’s open it as you can see this is from my website and here you can see the product details once your customers completed the payment you can deliver the product to your customer okay now you know how to receive your product payments but what about your customer how will they know about the order details so once your customers placed an order on your site they will receive an order confirmation email to the inbox so now if we go to our customers inbox
ALSO READ
you can see that our customer has received an email from our website so let’s open it and you can see that they have got the order details so this is how your customer can know about the order details okay now if we go to our website you can see that we still have the demo content on our website now let’s say you want to change the content on your site how will you do that so next let’s see how you can edit the content of your website to do that just click enter to the Elementor and you will get this editing section so
this is the place where you can edit the content of your website now let’s say you want to change this text so just click it then click here now here you can enter the text you want and you can see that the text has been changed now if you want to change this button text if you enter the text you want and you can see that the button text has been changed in the same way you can change any text you want on this page okay so let’s say you want to change the background image so to change it just click on the image
now drag and drop the image from your computer and you can see that we are successfully change the background image so in the same way you can change any image you want now let’s scroll down next let’s say you want to change this text all you have to do is just select the text then enter the text you want okay now if you want to change the products listed here go here then click this pencil icon now click here and select the group of products you want to show then select the product category you want and you can see that the product list
has been changed in the same way you can edit the content of your entire page to receive your changes click update and the changes will be saved now if we go to a site and click refresh you can see that our changes have been successfully applied to our site okay here you can see that we still have the default logo so next let’s see how you can add your own logo to your site now to add your logo click customize here and you will get these options to customize your website now to add your logo just click site identity
now click change logo then drag and drop your logo from your computer now to save your changes just click publish and the changes will be saved now if we go to our site and click refresh you can see that we as ghostly added our logo to our website so this is how you can add a logo to your grocery website okay now you know how to make a complete grocery store website next if we look here our site ends with mywp site dot org now instead of this what if you want your website address to have a simple address like your website name.com which looks more
professional and people can easily remember it you can do that by getting your own domain name for your set so next let’s see how you can add your own domain name to your grocery store website so to get your own domain name just go to the video you’re watching right now and click the link in the description and this will take you to webspacekit.
com where you can buy your domain name now here enter the name that you want for your website I’m going to enter Shop grocery now if we click search you can see that this domain name is available so once you find a name which is available to get this name for your website just click add to cart now it will ask you to change the hosting plan as we already have a hosting on make uwp let’s click skip here and you will get this card page now here you can see that we’re getting a domain name for one year and after one year you need to renew to keep using it
so to get this domain name let’s fill up these details and entire payment details once you’re done now click order now and you can see that we have made a payment now if we click continue then click domains you can see that we have got a domain name okay once you’ve got your domain name now how do you connect your domain name with your website so next let’s see how you can connect your domain name with your grocery store website so to connect it let’s select this and click manage DNS then you will get this page now we need
ALSO READ

to enter our website’s IP address next to the a record so regular website’s IP address just go to your vkwp dashboard let’s click here then click domains and you will get these details now just copy this IP address so let’s select it then click copy now let’s go back to our domain and paste the IP address here once you have done that now scroll down let’s click save changes and the changes will be saved okay now go back to making WP and here enter your domain name I am going to enter my domain name
once you’re done finally click connect domain and you can see that our domain is successfully connected to our website now people can access your website by entering your domain name and they can find your products on your website okay guys now our site is ready to use so next let’s see how our site looks on a mobile phone let’s open the browser on a mobile so just enter a website name and you can see how our site looks on a mobile phone now let’s see how people can purchase the products on your site using their
mobile phones now if they click shop they can see all your products now to purchase a product they can click add to cart then click checkout so just enter the details then fill up the payment details and if they click place order the order will be successfully placed on your site so this is how people can purchase products on your site using their mobile phones okay now we have a complete grocery store website so in this website we have used a WordPress theme to build our grocery site now in the future let’s
say you have got an update for the theme now you can use this website without updating the theme for as long as you want but if you want to have the latest version of the theme for your website you can purchase the theme and then update it to the latest version so to purchase the theme click the link below the video and you will get this page so this is the WordPress theme that we have used to build our grocery website so to get this theme we need to purchase it now this is a one-time fee and you don’t need to make any monthly
payments so let’s click add to cart then go to checkout and it’ll ask you to create an account I’m going to sign up with Google so let’s click on it now select a Google account and your account will be created to continue your purchase click secure checkout let’s fill up these details and once you have done that just click save now to get the theme let’s select a payment method now you can enter your payment details and once you’re done let’s click pay securely and you can see that we have
successfully made the payment and purchased the theme okay once you’ve got your team how will you know that you’ve got an update for your team now in order to receive the latest updates for your team first you need to download and install a plugin called envato Market on your site this plugin will help you receive the latest updates for your team so to download the plugin just click the link below this video and you will get this page now click download and the plugin will be downloaded to your computer now to install the plugin
ALSO READ 13 WordPress Tutorials
- How To Create Listing Pages on Your Website (Using Custom Post Types)
- How To Migrate WordPress Site to New Host 2024
let’s go to our site now go to plugins click add new and click upload plugin now drag this plugin and drop it here and the plugin will be selected here so let’s click install now then click activate and you can see that the plugin has been activated now scroll down and click envanto Market and here it will ask you to enter this token to get the updates for your theme now to get your token just click this link and it will ask you to sign into your inventor account but you can continue with Google or here
you can enter the details which you have used to create your account while purchasing your team I am going to continue with Google now here enter the name for your token I am going to enter grocery store let’s scroll down and click on this box now click create token and you can see that we have got a token now let’s copy the token and go to our site paste the token then click save changes and you can see that we have got the options here so now if we go to themes you can see that we have got a purchase theme in our
website so this means whenever a team has a new version you will get a notification like this so to update your theme all you have to do is just click on the notification and your theme will be updated to the latest version okay so now our website is ready next what if you want to create a mobile app for your store so that your customers can make orders right from their phones next let’s see how you can create a mobile app for your grocery store now instead of creating an app from scratch we are going to convert our
website into a mobile app like this where customers can see their products and make the orders okay now to create a mobile app just click the link below this video and it will take you to this website this is the site which is going to help us convert our site into an app now click convert website to app then here enter the URL of your website to do that let’s go to our site copy this URL paste it here and click get content now scroll down and here you can see a preference of how you want your app to look once you’re
done just scroll down and click next now here select if you want to show ads on your app as I don’t want ads I’m going to select no monetization now click next and here enter the name for your app again click next and now we need to select an icon for our app this is the icon which will be displayed on a mobile like this and as you can see a default icon has been selected now if you have your own icon just click custom icon and click upload now select the icon and click open now to crop your icon click crop
and your icon will be added here once you’ve done that just click next and click create now it will ask us to create an account I am going to select Google now as you can see our account has been successfully created and here we have our app ready and it can be downloaded so let’s click download and here we’ve got the link for our app which we can open on our mobile and download the app so to download it we can send the link to our mobile using this email option to do that just click Send let’s take our mobile and if we go to
ironbox you can see that we’ve got the email and here we have the option to download our app so let’s click it and the app will be downloaded now to install it just click open click install and our app will be successfully installed so let’s go to the home page and here you can see that we’ve got our app so let’s open it and as you can see we’ve got the app with all our products okay so now we successfully created our app next let’s see how a customer can order items on our app to order any item all you have to do is
just click add to cart now click checkout and here like we saw on our website the customer has to enter the address details so let’s enter these details then scroll down now here if the customer enters their payment details and clicks place order the order will be successfully completed okay so once a customer makes an order if we go to our WordPress dashboard then go to woocommerce here you can see that we have a new order notification so let’s click it and here we can see the new order if we click it
we can see the order details so we can go ahead and deliver the items to our customer okay so this is where your customers can order products from your app once you’ve created the app how do you let your customers download and use the app you can do that by adding your app to the Play Store once you do that your customers can download the app directly from the Play Store so if you want to know how to add your app to the Play Store you can watch this video okay now there’s one more way to let your customers download your app that is
by adding a section like this on your site so when a customer visits your site they can download your app from here so now if we go to our site we already have a section for our app now this is the default button and it doesn’t have a link to download our app so next let’s see how you can add your app link to your website to do that click customize and click widgets right here select the area where you have the button and as we have the button on the footer column I’m going to select that and here we have the button so let’s
click it and click here now we need to add the download link to our app so that when a customer clicks on the button they can download an app so to add the link let’s go to this website now copy this link then go back and paste it here if you want to open the app page in a new tab just click here enable this and click here now you can see that our link has been added here once you have done that just click publish now let’s see how our button works if we go to a site click refresh and if you click on this button
customers can download our app